Check if the installer has installed a fuse of the correct size when configuring the charger.
To access the Installation menu, you must first manually switch the fuse, otherwise the WiFi interface will remain locked and only show the end-user interface. After you’ve done that, follow these steps:
1. Keep pressing the touch button on your charger until the LED light strip glows green and you hear a confirmation tone. The charger has now created a local WiFi network.
2. Connect your phone to this charger WiFi network. The SSID of the WiFi network contains the serial number of your charger.
3. Open your phone’s web browser and enter 192.168.4.1 in the address field.
4. Log in with the pin code that you will find on the front of your charger (or at the back of the manual).
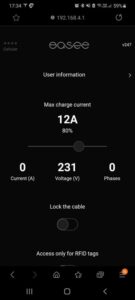
5. You can change the Max charge current here (see screenshot below). You can also proceed to Settings and follow the steps below.

6. Configure installation
7. Check the Fuse Current value.
Now compare the configured fuse current with the size of the fuse you see in the fuse box. We recommend that you set the value of Fuse Current slightly lower than the value of the real fuse, depending on the type of fuse. Certain fuses are more sensitive than others.
☝️We recommend that you set Max charge current to 80% of the fuse size
